16
Aug 2015
Expanding the primary (or other) disk in Azure
With Azure, you’ll see a few standards – a Windows server usually has a C:\ Drive with ~100gb free when you select it from the gallery. A linux server usually has a 30gb sda disk free.
Sometimes you need just a tad more on the primary or you have added a second disk and you want some more there as well. Currently, there’s no way to do it in the old portal (no disk controls at all) or the new portal (disk controls to add new disks only). The primary disk was limited to 127gb or so until recently. Now it can be 1tb.
Prerequisites:
If you’re using windows or the Azure Cli – Install an updated version of PowerShell and the PowerShell Azure plugin. Then Connect to Azure.
References:
https://azure.microsoft.com/en-us/documentation/articles/powershell-install-configure/
http://blogs.technet.com/b/heyscriptingguy/archive/2013/06/02/weekend-scripter-install-powershell-3-0-on-windows-7.aspx
If using Azure CLI
Use Azure AD method to login:
Open an Azure CLI window and type:
azure login
When prompted, type your username and password.
OR, use a PublishSettings file instead:
Open an Azure CLI window and type:
azure account download
This command opens a browser window and automatically downloads a .publishsettings file that contains information and a certificate for your Azure subscription.
Save the .publishsettings file and type:
azure account import
Where
For more information, read Connect to Azure from Azure CLI.
If using Azure PowerShell
Use Azure AD method to login:
Open an Azure PowerShell window and type:
Add-AzureAccount
When prompted, enter your organizational user id and password.
OR, use the PublishSettings files instead:
Open an Azure PowerShell window and type:
Get-AzurePublishSettingsFile
This command opens a browser window and automatically downloads a .publishsettings file that contains information and a certificate for your Azure subscription.
Save the .publishsettings file and type:
Import-AzurePublishSettingsFile
Where
Now then, onto the meat of this story
A Couple of commands we’ll need today:
PS C:\> Get-AzureService -servicename (servicename)

PS C:\> Get-AzureVM -ServiceName "(servicename)" -Name "(machinename)"

PS C:\> Get-AzureVM -ServiceName "(servicename)" -Name "(machinename)" | Stop-AzureVM -Force

PS C:\> Get-AzureVM -ServiceName "(servicename)" -Name "(machinename)" | get-AzureOSDisk

PS C:\> Update-AzureDisk -DiskName "(diskname)" -Label "ResizedOS" -ResizedSizeInGB 300
Where –
(servicename) = cloud service name that the vm is operating within
(machinename) = vm machine name
(diskname) = diskname
First, make sure you’re connected with Azure PS or Cli and we’ll run through the following commands.
1. I always like to make sure I can see the cloud service.
PS C:\> Get-AzureService -servicename AzureNP
VERBOSE: 6:20:06 PM - Begin Operation: Get-AzureService

ServiceName             : AzureNP

Url                     : https://management.core.windows.net/….

Label                   : AzureNP

Description             :

Location                : Central US

AffinityGroup           :

Status                  : Created

ExtendedProperties      : {[ResourceGroup, AzureNP], [ResourceLocation, Central US]}

DateModified            : 7/17/2015 2:29:14 PM

DateCreated             : 7/17/2015 2:28:50 PM

ReverseDnsFqdn          :

WebWorkerRoleSizes      : {}

VirtualMachineRoleSizes : {}

OperationDescription    : Get-AzureService

OperationId             : b67d...

OperationStatus         : Succeeded
VERBOSE: 6:20:07 PM - Completed Operation: Get-AzureService
2. The machine needs to be stopped and deallocated before the primary disk can be expanded. So, lets take a look at the vm’s status.
PS C:\> Get-AzureVM -ServiceName "AzureNP" -Name "vm-host-01"
VERBOSE: 6:25:56 PM - Completed Operation: Get Deployment
DeploymentName              : vm-host-01

Name                        : vm-host-01

Label                       :

VM                          : Microsoft.WindowsAzure.Commands.ServiceManagement.Model.PersistentVM

InstanceStatus              : StoppedDeallocated

IpAddress                   :

InstanceStateDetails        :

PowerState                  : Stopped

InstanceErrorCode           :

InstanceFaultDomain         :

InstanceName                : vm-host-01

InstanceUpgradeDomain       :

InstanceSize                : Standard_D2

HostName                    :

AvailabilitySetName         :

DNSName                     : http://AzureNP.cloudapp.net/

Status                      : StoppedDeallocated

GuestAgentStatus            : Microsoft.WindowsAzure.Commands.ServiceManagement.Model.GuestAgentStatus

ResourceExtensionStatusList : {}

PublicIPAddress             :

PublicIPName                :

PublicIPDomainNameLabel     :

PublicIPFqdns               : {}

NetworkInterfaces           : {}

VirtualNetworkName          : Azure-Vnet1

ServiceName                 : AzureNP
OperationDescription        : Get-AzureVM

OperationId                 : 31e4….

OperationStatus             : OK
3. If we haven’t stopped the vm, lets stop it.
PS C:\> Get-AzureVM -ServiceName "AzureNP" -Name "vm-host-01" | Stop-AzureVM -Force
VERBOSE: 6:19:06 PM - Completed Operation: Get Deployment

VERBOSE: 6:19:07 PM - Completed Operation: Get Deployment

VERBOSE: 6:19:07 PM - Begin Operation: Stop-AzureVM

VERBOSE: 6:19:39 PM - Completed Operation: Stop-AzureVM
OperationDescription OperationId                          OperationStatus

-------------------- -----------                          ---------------

Stop-AzureVM         666…                                 Succeeded
4. We need to know the disk name that we’re going to expand, so lets find it.
PS C:\> Get-AzureVM -ServiceName "AzureNP" -Name "vm-host-01" | get-AzureOSDisk
VERBOSE: 6:22:13 PM - Completed Operation: Get Deployment

HostCaching     : ReadWrite

DiskLabel       :

DiskName        : vm-host-01-vm-host-01-0-2015...

MediaLink       : https://...blob.core.windows.net/…...

SourceImageName : 511…..

OS              : Linux

IOType          : Standard

ResizedSizeInGB :

ExtensionData   :
5. Let’s expand that disk to 300gb for fun.
PS C:\> Update-AzureDisk -DiskName "vm-host-01-vm-host-01-0-2015..." -Label "ResizedOS" -ResizedSizeInGB 300
VERBOSE: 6:24:16 PM - Begin Operation: Update-AzureDisk

VERBOSE: 6:24:47 PM - Completed Operation: Update-AzureDisk
OperationDescription OperationId                          OperationStatus

-------------------- -----------                          ---------------

Update-AzureDisk     0e692...                             Succeeded
6. Restart the VM. Feel free to be lazy and use the azure console.
Now, there’s a few things to do still… If you’re using windows, well, just expand the disk.
7. 
If you’re in Linux… Well, a couple of more steps to go.
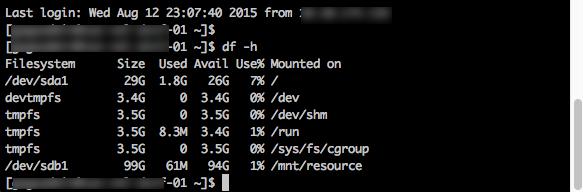
8. Login to the VM via SSH and lets look to see how the disks are structured:
[adminlogin@vm-host-01 ~]$ df -h
Filesystem      Size  Used Avail Use% Mounted on
/dev/sda1        29G  1.6G   26G   6% /
devtmpfs        3.4G     0  3.4G   0% /dev
tmpfs           3.5G     0  3.5G   0% /dev/shm
tmpfs           3.5G  8.3M  3.4G   1% /run
tmpfs           3.5G     0  3.5G   0% /sys/fs/cgroup
/dev/sdb1        99G   61M   94G   1% /mnt/resource
[adminlogin@vm-host-01 ~]$ lsblk
NAME   MAJ:MIN RM  SIZE RO TYPE MOUNTPOINT
sda      8:0    0  300G  0 disk
├─sda1   8:1    0   29G  0 part /
└─sda2   8:2    0 1000M  0 part
sdb      8:16   0  100G  0 disk
└─sdb1   8:17   0  100G  0 part /mnt/resource
sdc      8:32   0  200G  0 disk
9. Lets go hack apart the disk sda and expand it using fdisk – don’t worry – no damage will occur – as long as you don’t end up reducing size the drive 😉 You’ll see what I do here is delete the partitions. The reason there is that the swap partition (sda2) is tucked up against the sda1 partition, so I’ve got to get one contiguous space to make into a drive. Then I recreate sda1 with the majority of the disk space, then create sda2 swap space. Note the quick calculation there to have space left for the swap. Then I go back and make sure sda2 is set to partition type linux swap and save it, and reboot.
[adminlogin@vm-host-01 ~]$ sudo -u root fdisk /dev/sda
[sudo] password for adminlogin:
Welcome to fdisk (util-linux 2.23.2).

Changes will remain in memory only, until you decide to write them.
Be careful before using the write command.


Command (m for help): p

Disk /dev/sda: 322.1 GB, 322122547200 bytes, 629145600 sectors
Units = sectors of 1 * 512 = 512 bytes
Sector size (logical/physical): 512 bytes / 512 bytes
I/O size (minimum/optimal): 512 bytes / 512 bytes
Disk label type: dos
Disk identifier: 0x00083660

   Device Boot      Start         End      Blocks   Id  System
/dev/sda1   *        2048    60866559    30432256   83  Linux
/dev/sda2        60866560    62914559     1024000   82  Linux swap / Solaris

Command (m for help): d
Partition number (1,2, default 2): 1
Partition 1 is deleted

Command (m for help): d
Selected partition 2
Partition 2 is deleted

Command (m for help): p

Disk /dev/sda: 322.1 GB, 322122547200 bytes, 629145600 sectors
Units = sectors of 1 * 512 = 512 bytes
Sector size (logical/physical): 512 bytes / 512 bytes
I/O size (minimum/optimal): 512 bytes / 512 bytes
Disk label type: dos
Disk identifier: 0x00083660

   Device Boot      Start         End      Blocks   Id  System

Command (m for help): n
Partition type:
   p   primary (0 primary, 0 extended, 4 free)
   e   extended
Select (default p):
Using default response p
Partition number (1-4, default 1):
First sector (2048-629145599, default 2048):
Using default value 2048
Last sector, +sectors or +size{K,M,G} (2048-629145599, default 629145599): 627097599
Partition 1 of type Linux and of size 299 GiB is set

taking 629145599 - 2048000 - to give us 1gb swap available of the 300gb drive

Command (m for help): n
Partition type:
   p   primary (1 primary, 0 extended, 3 free)
   e   extended
Select (default p): p
Partition number (2-4, default 2):
First sector (627097600-629145599, default 627097600):
Using default value 627097600
Last sector, +sectors or +size{K,M,G} (627097600-629145599, default 629145599):
Using default value 629145599
Partition 2 of type Linux and of size 1000 MiB is set

Command (m for help): p

Disk /dev/sda: 322.1 GB, 322122547200 bytes, 629145600 sectors
Units = sectors of 1 * 512 = 512 bytes
Sector size (logical/physical): 512 bytes / 512 bytes
I/O size (minimum/optimal): 512 bytes / 512 bytes
Disk label type: dos
Disk identifier: 0x00083660

   Device Boot      Start         End      Blocks   Id  System
/dev/sda1            2048   627097599   313547776   83  Linux
/dev/sda2       627097600   629145599     1024000   83  Linux

Command (m for help): t
Partition number (1,2, default 2): 2
Hex code (type L to list all codes): 82
Changed type of partition 'Linux' to 'Linux swap / Solaris'

Command (m for help): p

Disk /dev/sda: 322.1 GB, 322122547200 bytes, 629145600 sectors
Units = sectors of 1 * 512 = 512 bytes
Sector size (logical/physical): 512 bytes / 512 bytes
I/O size (minimum/optimal): 512 bytes / 512 bytes
Disk label type: dos
Disk identifier: 0x00083660

   Device Boot      Start         End      Blocks   Id  System
/dev/sda1            2048   627097599   313547776   83  Linux
/dev/sda2       627097600   629145599     1024000   82  Linux swap / Solaris

Command (m for help): w
The partition table has been altered!

Calling ioctl() to re-read partition table.

WARNING: Re-reading the partition table failed with error 16: Device or resource busy.
The kernel still uses the old table. The new table will be used at
the next reboot or after you run partprobe(8) or kpartx(8)
Syncing disks.
[adminlogin@vm-host-01 ~]$ shutdown -r now
10. When the vm comes back. lets make sure we put a swap id somewhere and we can check if we’re using any at the same time.
[adminlogin@vm-host-01 ~]$ sudo -u root mkswap /dev/sda2
[sudo] password for adminlogin:
Setting up swapspace version 1, size = 1023996 KiB
no label, UUID=9eb4a82f-2d35-4192-b366-4fbcbb017701
[adminlogin@vm-host-01 ~]$ swapon -a
[adminlogin@vm-host-01 ~]$ free -m
              total        used        free      shared  buff/cache   available
Mem:           6970         153        6691           8         125        6655
Swap:             0           0           0
[adminlogin@vm-host-01 ~]$ cat /proc/swaps
Filename	Type	Size	Used	Priority
11. Now, lets resize the partition and check to see what we have now.
[adminlogin@vm-host-01 ~]$ sudo -u root resize2fs /dev/sda1
[sudo] password for adminlogin:
resize2fs 1.42.9 (28-Dec-2013)
Filesystem at /dev/sda1 is mounted on /; on-line resizing required
old_desc_blocks = 4, new_desc_blocks = 38
The filesystem on /dev/sda1 is now 78386944 blocks long.

[adminlogin@vm-host-01 ~]$ df -h
Filesystem      Size  Used Avail Use% Mounted on
/dev/sda1       295G  1.6G  281G   1% /
devtmpfs        3.4G     0  3.4G   0% /dev
tmpfs           3.5G     0  3.5G   0% /dev/shm
tmpfs           3.5G  8.3M  3.4G   1% /run
tmpfs           3.5G     0  3.5G   0% /sys/fs/cgroup
/dev/sdb1        99G   61M   94G   1% /mnt/resource
[adminlogin@vm-host-01 ~]$ lsblk
NAME   MAJ:MIN RM  SIZE RO TYPE MOUNTPOINT
sda      8:0    0  300G  0 disk
├─sda1   8:1    0  299G  0 part /
└─sda2   8:2    0 1000M  0 part
sdb      8:16   0  100G  0 disk
└─sdb1   8:17   0  100G  0 part /mnt/resource
sdc      8:32   0  200G  0 disk
[adminlogin@vm-host-01 ~]$
12. All set… Now then… I guess the window’s gui was a little easier there at the end, but it felt more destructively awesome on linux.